Don’t buy second-hand trouble 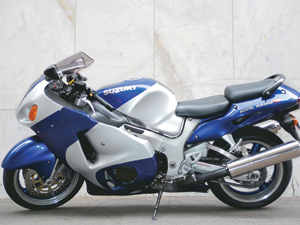
It was my pride and joy…honest!
Words: Stuart Woodbury; Photos: The Bear
Most of us don’t have the luxury of buying new bikes so we anxiously try to sort the good from the bad as we search the plethora of second-hand bikes from private sellers and dealers.
Many prospective buyers look the bike over and sometimes take it for quick spin around the block. If everything appears good, they outlay their hard-earned and think they have a good thing. But are they buying what they think you are?
To test some theories, the Bear and I decided to call into a random second-hand motorcycle dealer, set our price limit at $10,000 and pick a bike on the lot.
As we came across bikes we fancied, The Bear took a good look over each one first to find most of the cosmetic issues and then I examined them with a fine tooth comb and usually found more potential issues. So the first hint is to always take an extra set of eyes when buying a bike and/or use the services of a professional motorcycle inspection company.
Our second-hand choice
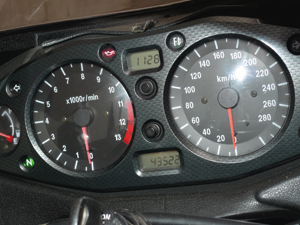
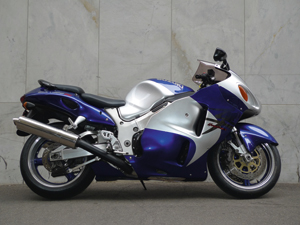
The bike we chose was a blue/silver, 2000 model Suzuki GSX1300R Hayabusa priced at $12,000 with 43,520km on the dial. Right away we overstepped our price limit simply because there was nothing else on the lot that would start! According to Glass’s Guide, the bike was priced well over the top end of the range, which at the time of writing was between $7200-$9700, depending on condition.
On the showroom floor, the Hayabusa looked the goods but when we took it out into the daylight we other issues that really showed what a roughie we had picked. 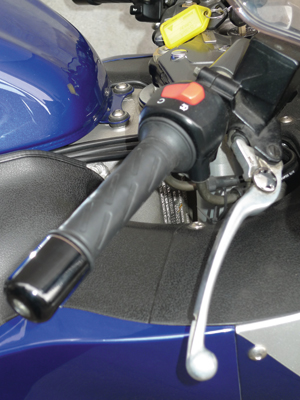
The bike appeared to have been crashed or it had fallen off its sidestand and generally didn’t look as if it had been well maintained. It did have polished and painted rims, which can indicate a bike that has been crashed. It also had brand new tyres, which may mean it was recently fixed or the old ones had worn out. The bike also had a set of performance end cans.
A 10-minute test ride on our mule revealed a potential chain and sprocket issue – it felt snatchy when this model is usually quite smooth to ride. The engine’s top end was very rattly (could be the known cam tensioner issue). The front brakes pulled to the left and had basically no power and feel, when Hayabusa brakes are normally quite strong.
How much these issues would cost to fix would depend on what needs rebuilding or replacing.
It looks okay – but here’s what we found wrong with the Hayabusa
The Hayabusa decal on the left fairing was missing.
The nose cone did not match the colour of the right-hand fairing.
Rattly top end of the motor.
Snatchy drive train and worn sprockets and chain. The front brakes were pulling to the left.
The front brake fluid was low.
It was grubby under the fairings.
The right-hand mirror was scraped.
Rear shock was leaking.
The front guard was cracked.
Rear disc was badly scored and the pad was low.
Issues such as these can be great negotiating points to reduce the price and you can worry about fixing them later; or you can tell the seller to fix the issues and then pay the price.
Verdict: There is no way we would buy the bike at this price.
Road Rider’s second-hand bike buyer’s checklist
We love to help our readers and keep you informed, so we have come up with a basic buyer’s checklist you can use when buying a second-hand bike. A test ride can give you valuable information about a used motorcycle but only to a certain extent (due to limited time on the bike), so before you go for a spin, here are some ways to find potential problem spots.
Be cool
Resist the temptation to buy the first bike you see. Look at a few of them to get a better idea of the used bike market/options before you buy. Remember, forewarned is forearmed.
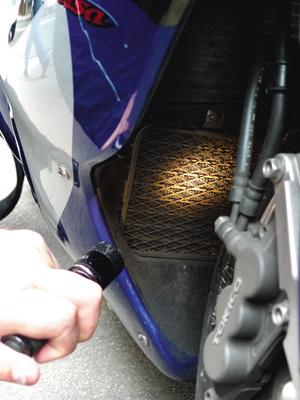
Bring a flashlight to aid inspection. Even in daylight.
Request that the owner/dealer NOT have the bike warmed up when you get there.
If the owner/dealer asks why, say you want to test the bike’s ability to start from cold. (It’s a lot easier for engines to start when pre-warmed.)
Take your riding gear in case the seller will let you take a test ride.
Take a notepad and write down potential repairs that need doing.
As a general rule of thumb, most motorcycle mechanics charge about $80-$120 an hour (plus parts).
Take a friend
Taking a friend and/or more than one friend can be one of the most valuable things when looking at second-hand goods. Some sellers/dealers will try and talk to you constantly to take your mind off the job at hand but having a friend/s with you, they can be looking over the bike uninterrupted while you chew the fat with the seller/dealer.
Check the frame
The most important thing to look for is the condition of the frame. The smallest crack, hairline fracture, scratch or dent on a frame can make a bike a statutory write-off and it can pose a potential safety hazard. If it has frame damage, walk away.
Has it been crashed?
Look for the following: deep parallel scratches on engine cases and on plastics; a different paint job; paint or metal ground off the ends of the handlebars, or off the ends of the clutch/brake levers; scratched, bent or aftermarket mirrors; dents in the gas tank where the handlebars may have smashed into it during a crash; turn stops on the triple clamps broken off from a hard crash; dents and scratches in exhaust pipes; turn-signal stalks bent or ripped off; cracks in plastic bodywork obscured by stickers.
All of these things don’t necessarily mean the bike has been crashed but it’s an indication it has been dropped or knocked over. Check carefully.
Check the chain and sprockets
A visual inspection of a chain might reveal corrosion but you should also check its flexibility by pushing and pulling a section, moving the bike a few centimetres forward at a time and repeating until you’ve tested the entire length of the chain. It should move roughly between 30-50mm in either direction. Also take a look at the sprockets. The shape of their teeth should be even and their tips shouldn’t be excessively worn.
Check, don’t kick, the tyres
Next, look at the tyres and make sure the wear is evenly distributed, not focused on one side. Tread depth should not be past the wear indicators. Proper inflation levels will also ensure the tread patterns are even.
Brakes
Put the bike in neutral. Roll the bike forward; gently apply the front brakes. They should engage (and the lever should move) smoothly. Now release the brake lever and roll the bike, are the brakes off, or are they dragging? Stand in front of the bike with the bike in neutral. Grab the front brake lever and squeeze it hard against the handlebar. As you’re doing this, try to drag the bike forward by the handlebars. Do the brakes prevent the front wheel from moving? They should. If you squeeze the front brake lever and it comes all the way back to the bar without much resistance, something’s very wrong. 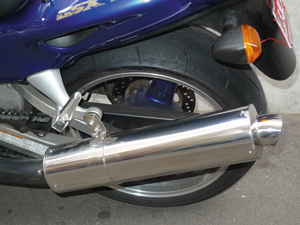
To check the rear brake, roll the bike forward and use the rear brake to stop the bike. It should also engage smoothly. If the rear brake is a drum brake, (no exposed brake rotor) is the wear indicator needle inside or outside the “usable range” indicator when the brakes are applied?
Check the remaining brake pad material. There should be at least 2mm of brake pad material on each brake pad. For bikes with disc brakes, get in front of the bike and look into the calipers, on either side of the rotor(s). A flashlight might help, even in daylight.
Rotors should be a certain minimum thickness and shouldn’t vary more than a certain amount when spun. This kind of information will be in the service manual.
Brake fluid should be very light amber. Darker than honey means it’s time to replace the brake fluid.
Compress the suspension and check the steering head
Once you’ve taken a look at the individual components, sit on the bike, grab the front brake and try compressing the forks; they should react with firm resistance and rebound all the way back to their starting point. Also, inspect for stone chips on the fork legs, oil leakage and/or surface irregularities.
The same goes for the rear shock/s, compress down on the seat and see if they come back to standard. There should be no squeaking or binding on either front or rear. If the bike has a centre stand, prop it up and turn the handlebar from lock to lock. The bar should be free from irregularities or bends and the head should move smoothly in either direction.
Clutch
Ask the owner if the clutch has ever been changed or how many kilometres it’s been since the change. Ask if the clutch cable has ever been replaced.
Put the bike in first gear, squeeze the clutch all the way in, roll it forward. It should feel like neutral, with possibly a little more resistance. Slowly let the clutch out and feel for the friction zone. Clutch engagement should be fairly smooth, not abrupt. Put the bike back in neutral.
Check for completeness and consider maintenance needs
After inspecting key mechanical components, you’ll want to look for anything that’s missing – whether it’s parts of the fairing, side covers, small nuts and bolts, or pieces of trim. Seemingly harmless parts can be surprisingly expensive to replace, so call a dealership to get an estimate of what it will take to get them replaced.
Budgeting for necessary parts and taking into account when the bike is due for its next routine maintenance will help give you an overall idea of how much the second-hand bike will cost.
Has it been raced?
This will mainly apply to sports bikes as they tend to be used for track days, competition racing or weekend warrior racing events. Racing puts tremendous stress on machinery. You may or may not want to buy a bike that’s been raced but you should definitely try to find out if it has or hasn’t been raced, so you can adjust the price.
Check to see if the kilometres on the bike match its condition. Most race bikes will have low mileage. Check to see if the sump plug, coolant drain plug, radiator cap, and so on, have been drilled and wired. This is a requirement for race bikes under the current regulations. Does it have brand new fairings? This will show that the bike has been put back into road trim for sale.
Known bike issues
Some models have specific problems that you should be aware of. Ask dealerships, bike-savvy friends if they know of anything. Read magazine reviews and check the internet but be wary of unsupported claims there. Learn as much as you can about the models you’re interested in.
Seat
Look for tears in the vinyl cover. New upholstery will cost about $100-$150 from an auto/marine re-upholstery business.
Electrics
Basically, check that all the switches, headlights, tail lights as well as the indicators, horn, speedometer and instrument-cluster lights are working correctly. Check for dimming of headlights at idle and when under load, if it dims, there is an issue.
If the bike has one (some bikes are designed without it), you should also test to make sure that the sidestand’s engine cut-off is working. These are designed to prevent you from riding off with the sidestand down and having a spill.
Check the battery leads
Clean battery leads indicate that a bike hasn’t been sitting around unridden. Though clean leads won’t necessarily reveal the longevity of the battery, a lack of corrosion is a good sign you should look for.
Wheels
Look carefully around the circumference of both sides of both wheels and look for dents or irregularities. Check the wheel bearings by supporting the wheel off the ground, gripping the top and bottom of the wheel and checking for any movement.
Service
Ask the owner if the bike has been serviced according to the manufacturer’s specifications, and, if so, for service receipts as verification.
If you feel uncertain about the bike’s condition, it’s not unreasonable to request that the seller take the bike to a mechanic of your choosing for inspection or employ the services of a motorcycle inspection company, obviously, at your expense.
A quick indication of it possibly being in good condition is to look at the oil and coolant levels as well.
Test ride
Most sellers probably won’t give you a test ride for liability reasons but bring riding gear just in case. You can learn a lot about a bike from a quick test ride but not everything, as we found out.
Is this the bike I want?
Often, what looks great in photographs and sounds great in website reviews falls flat in person. Even if the bike itself is sound, if the model didn’t stand up to its lofty reputation go back to the drawing board. This is your last chance.
Negotiate
Don’t just meet the asking price without trying to get a better deal. Know the price range of the bike so you don’t pay too much. Every item you found wrong is a negotiating point. You may get nowhere but you might save a few hundred bucks, too. And never forget the power of these seven words: “Is that the best you can do?”
Accessories
Does the bike come with any accessories? If so, what are they and do they really add any value?
Titles and registration papers
Make sure the VIN number on the bike matches the VIN number on the registration papers. Make sure the engine number and registration number match the registration papers. If the seller doesn’t have the registration papers, walk away. Make sure you check this before you hand over the money.
The REVS check is available to buyers in NSW, ACT, WA and NT. This is done through a government body. The NSW RTA’s website has another check called a vehicle history check which identifies interstate anomalies. Queensland has the Vcheck and Victoria and South Australia have the VSR check done through the transport authority in each State.
Bits and pieces
When you end up buying a bike, make sure you get everything related to the bike: the main key, any spare keys and any spares/accessories, registration papers and the service manual.
After the purchase
Fill out the registration papers with the seller before riding away. Get the bike insured.
Take it easy as you get used to a new machine. Respect your bike’s power, characteristics, abilities, (including your abilities) and get used to it slowly.
If all of these points seem awkward or time-consuming, just remember that doing your homework will make buying a used bike that much more rewarding in the long run.
Congratulations! Enjoy your new bike!
Never forget the power of these seven words: “Is that the best you can do?”
It looked tidy. We checked the frame first – if it had been damaged we would have walked away.
Is this crash damage, or did it fall off its sidestand?
Cracks in the front guard indicate a crash.
Hey! Where’s the Hayabusa logo?
More scuffs.
Poor front brakes pulled to the left. Rims are polished and painted. Why?
Worn chain and sprockets. We spotted a leaking rear shock, too.
Badly scored rear disc and worn out brake pads.
The tyres were new. Good!
We checked the handlebars/levers for damage and we checked the VIN plate.
Low mileage for the model year can indicate that a bike has been raced.
Use your torch to check all the dark places.
Is there any damage to the pipes?
We did our homework to find out this model’s known problems before we inherited them.
TICK ITEMS THAT PASS OR CROSS ITEMS THAT FAIL AND THEN SEE WHETHER THE BIKE IS WORTH THE PRICE.
FRAME
HAS IT BEEN CRASHED Y/N?
CONDITION OF CHAIN & SPROCKETS
ELECTRICS
BATTERY
TYRES
BRAKES
SUSPENSION & STEERING HEAD
COMPLETENESS (IS EVERYTHING THERE?)
HAS IT BEEN RACED Y/N?
CLUTCH
ANY KNOWN ISSUES WITH MODEL Y/N?
SEAT
WHEELS
SERVICE HISTORY
ACCESSORIES
TITLE AND REGISTRATION PAPERS
TEST RIDE